- Print out these instructions as we may need to close every window that is open later in the fix.
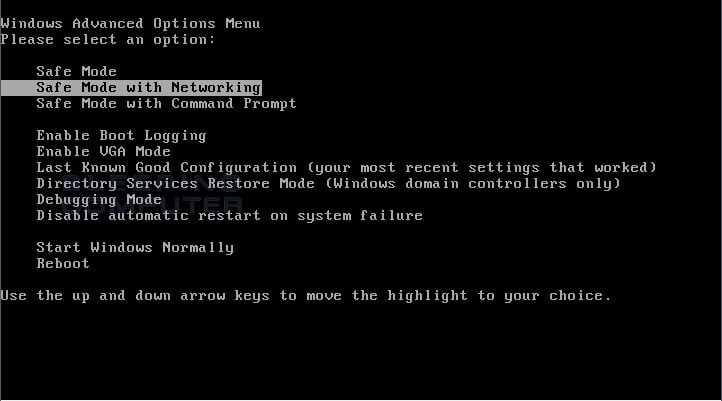
- Reboot your computer into Safe Mode with Networking. To do this, turn your computer off and then back on and immediately when you see anything on the screen, start tapping the F8 key on your keyboard. Eventually you will be brought to a menu similar to the one below:

Using the arrow keys on your keyboard, select Safe Mode with Networking and press Enter on your keyboard. If you are having trouble entering safe mode, then please use the following tutorial: How to start Windows in Safe Mode
Windows will now boot into safe mode with networking and prompt you to login as a user. Please login as the same user you were previously logged in with in the normal Windows mode. Then proceed with the rest of the steps. - It is possible that the infection you are trying to remove will not allow you to download files on the infected computer. If this is the case, then you will need to download the files requested in this guide on another computer and then transfer them to the infected computer. You can transfer the files via a CD/DVD, external drive, or USB flash drive.
- Before we can do anything we must first end the processes that belong to Antivirus 2010 so that it does not interfere with the cleaning procedure. To do this, please download RKill.com to your desktop from the following link.
rkill.com Download Link - (Download page will open in a new tab or browser window.)
When at the download page, click on the Download Now button to download RKill.com and save it on your desktop. - Once it is downloaded, double-click on the rkill.com in order to automatically attempt to stop any processes associated with Antivirus 2010 and other Rogue programs. Please be patient while the program looks for various malware programs and ends them. When it has finished, the black window will automatically close and you can continue with the next step. If you get a message that rkill is an infection, do not be concerned. This message is just a fake warning given by Antivirus 2010 when it terminates programs that may potentially remove it. If you run into these infections warnings that close Rkill, a trick is to leave the warning on the screen and then run Rkill again. By not closing the warning, this typically will allow you to bypass the malware trying to protect itself so that rkill can terminate Antivirus 2010 . So, please try running Rkill until the malware is no longer running. You will then be able to proceed with the rest of the guide. If you continue having problems running rkill.com, you can iExplore or eXplorer.exe from the rkill download page. Both of these files are renamed copies of rkill.com, which you can try instead. Please note that the download page will open in a new browser window or tab.
Do not reboot your computer after running rkill as the malware programs will start again. - Now you should download Malwarebytes' Anti-Malware, or MBAM, from the following location and save it to your desktop:
Malwarebytes' Anti-Malware Download Link (Download page will open in a new window) - Once downloaded, close all programs and Windows on your computer, including this one.
- Double-click on the icon on your desktop named mbam-setup.exe. This will start the installation of MBAM onto your computer.
- When the installation begins, keep following the prompts in order to continue with the installation process. Do not make any changes to default settings and when the program has finished installing, make sure you leave both the Update Malwarebytes' Anti-Malware and Launch Malwarebytes' Anti-Malware checked. Then click on the Finish button. If MalwareBytes' prompts you to reboot, please do not do so.
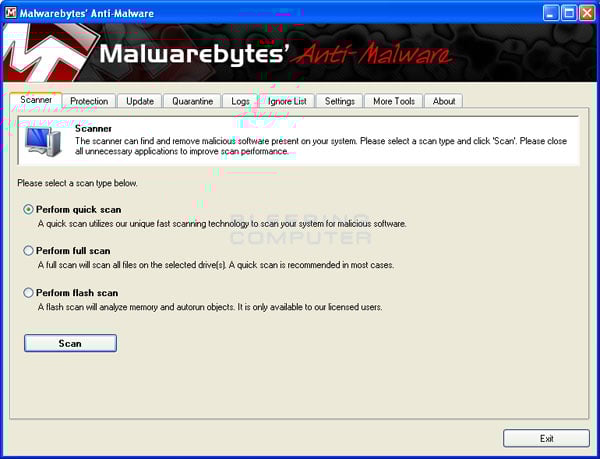
- MBAM will now automatically start and you will see a message stating that you should update the program before performing a scan. As MBAM will automatically update itself after the install, you can press the OK button to close that box and you will now be at the main program as shown below.

- On the Scanner tab, make sure the the Perform full scan option is selected and then click on the Scan button to start scanning your computer for Antivirus 2010 related files.
- MBAM will now start scanning your computer for malware. This process can take quite a while, so we suggest you go and do something else and periodically check on the status of the scan. When MBAM is scanning it will look like the image below.

- When the scan is finished a message box will appear as shown in the image below. You should click on the OK button to close the message box and continue with the Antivirus2010 removal process.

- You will now be back at the main Scanner screen. At this point you should click on the Show Results button.
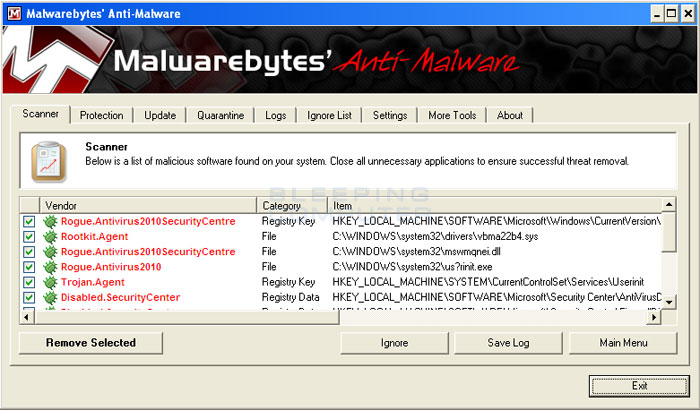
- A screen displaying all the malware that the program found will be shown as seen in the image below. Please note that the infections found may be different than what is shown in the image.

You should now click on the Remove Selected button to remove all the listed malware. MBAM will now delete all of the files and registry keys and add them to the programs quarantine. When removing the files, MBAM may require a reboot in order to remove some of them. If it displays a message stating that it needs to reboot, please allow it to do so. Once your computer has rebooted, and you are logged in, please continue with the rest of the steps. - When MBAM has finished removing the malware, it will open the scan log and display it in Notepad. Review the log as desired, and then close the Notepad window.
- You can now exit the MBAM program.
- As this infection also changes your Windows HOSTS file, we want to replace this file with the default version for your operating system. Please note that if you or your company has added custom entries to your HOSTS file then you will need to add them again after restoring the default HOSTS file. In order to protect itself, Antivirus2010 changes the permissions of the HOSTS file so you can't edit or delete it. To fix these permissions please download the following batch file and save it to your desktop:
hosts-perm.bat Download Link
When the file has finished downloading, double-click on the hosts-perm.bat file that is now on your desktop. If Windows asks if you if you are sure you want to run it, please allow it to run. Once it starts you will see a small black window that opens and then quickly goes away. This is normal and is nothing to be worried about. You should now be able to access your HOSTS file. - We now need to delete the C:\Windows\System32\Drivers\etc\HOSTS file. Once it is deleted, download the following HOSTS file that corresponds to your version of Windows and save it in the C:\Windows\System32\Drivers\etc folder. If the contents of the HOSTS file opens in your browser when you click on a link below then right-click on the appropriate link and select Save Target As..., if in Internet Explorer, or Save Link As.., if in Firefox, to download the file.
Windows XP HOSTS File Download Link
Your Windows HOSTS file should now be back to the default one from when Windows was first installed.
Windows Vista HOSTS File Download Link
Windows 2003 Server HOSTS File Download Link
Windows 2008 Server HOSTS File Download Link
Windows 7 HOSTS File Download Link - Now reboot your computer.
- As many rogues and other malware are installed through vulnerabilities found in out-dated and insecure programs, it is strongly suggested that you use Secunia PSI to scan for vulnerable programs on your computer. A tutorial on how to use Secunia PSI to scan for vulnerable programs can be found here:
Advertisement
Automated Removal Instructions for Antivirus 2010 using Malwarebytes' Anti-Malware:
om
10:53 AM
Automated Removal Instructions for Antivirus 2010 using Malwarebytes' Anti-Malware:


0 Comments